Wednesday, February 28, 2018

May cause one to reminiscent ... !

There's nothing like looking at your parent's photo albums to bring back lots of memories. Unlike me who has stacks of pictures of my little Pumpkin sitting in a box, un-organized, my mum was great at keeping her photo album up to date.

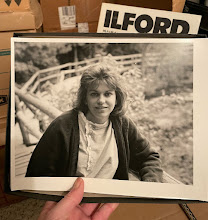
I came across this picture of me and wondered what happened to that fun loving, crazy girl!


I do know what happened, life. Strange how the years can cause one to mellow, and not always in a good and fun way.

I've been doing a lot of thinking about the masks we acquire throughout life. Mainly thinking about the ones I have acquired from the years of life experiences. We all have masks, some are healthy and others, well ... let's just say, may have been acquired as a survival mechanism.

Regardless of how these masks were acquired, it's good to sit back and do a bit of introspection, reflect on our life; pictures are a great tool to help you with that.

That evening, on my drive home from mum's, I contemplated who I was before the masks began to define me. I thought of a picture that would best represent an unmasked me. I knew exactly which picture.  Here she is ...


I just love that picture ... I know this little girl well, confident, fearless and full of joie de vivre.

So, I've been working on this new self ... more particularly the joie the vivre aspect. Time to get a little crazy and just have fun! Hum ... like posting that crazy shock picture! lol

So, who were you before the masks? What's holding you back? I do hope you will take the time to get to know the real you and enjoy the moment. Life sure is short, so why not enjoy it to its fullest!

Thanks for stopping by my little corner in cyberspace. Catch you all later! Oh, don't forget to hang loose and have fun ... I am! lol

Monday, February 19, 2018

In my defense ... !

I've been thinking about the number of quilting UFOs that remain undone and decided that I needed to do some math.

From 2007 until 2017 I started 258 quilting projects (queen size quilts to table runners) of which 50 remain undone. Oh, and in that 258 total, it does not include the numerous hand embroidered towels I have stitched and given as gifts.

Statistically, it means that I complete 81% of my projects! Yea, I'm a glass half full kind of gal! lol

Well, one can only work on quilting UFOs for so long until one has an uncontrollable desire to start a new project. Let's face it, I've been good at completing projects, many of which didn't have much done on it!

To deal with a bit of the guilt from starting something new when I still have UFOs lurking, I chose a wool kit I had purchased, oh ... probably around 2006 ... (ah, I was close, April 2007, thanks to blogging!) at The Quilted Crow. There, no more guilt! lol

Ta dah!


The pattern is called Bunny Luv Tablerunner by Pickering Farm. I do like how it turned out. However, I learned that I am not a fan of wool centers with cotton borders.

I was perplexed as to how I would finish the runner. Do I use batting?

I do not like flimsy borders, so I opted for a thin layer of cotton batting. With that, came the necessity to machine quilt so that the layers would be secured.

Thank you for stopping by! Enjoy the moment! Cheers!

Saturday, February 17, 2018

Under the Christmas Tree ... a tutorial ...!

I just thought I would share a bit how I did the wool tree skirt.

When I have a lot of placement pieces on a project, I like to section off areas so that it is easier for me to balance the design.

In the case of this pattern, I used the houses as a dividing point and one wool tree to assist with positioning other pieces accordingly. I then proceeded to hand embroider the trees.


I used my favourite method for transferring ... Transfer eze ... I created a sheet of the designs that needed to be stitched and photocopied it.


Once the trees were hand embroidered, I rinsed the product off and let it dry, usually overnight.

I will then continue to add various elements of the pattern while maintaining a balance.


Once all the pattern pieces are stitched, it was time to create the center circle and cut for the tree trunk. 

I used the original tree skirt circle template (created out of freezer paper). I tend to work in quarters (you can see the drawn sections), so it was easy for me to draw a centered circle using a compass.

I placed the original template on the wool project making sure that the cutting line was positioned correctly.  Pinned it, making sure that all was stable and ... this is the scary part ... proceeded to cut ... carefully!


For wool work, I use Karen Kay Buckley's 7.5 inch scissors. They have a micro serrated blade, perfect for wool work. They also come with a plastic guard.


I used wool for the backing. I re-used the original template to cut the backing.

I layered the top and backing, pinned it making sure it would be stable and blanket stitched around.


Due to the weight of the project, in order to avoid stretching the cut area and center circle, I started stitching an inch away from the left cut (I'm right handed), worked my way up and around the center hole and back down the cut continuing on the right. I felt that, once stitched, it would stabilize as well as minimize stretching. 

There you have it, some tips on creating a small wool tree skirt.

Thank you so much for stopping by my little corner in cyberspace! Cheers!

Monday, February 12, 2018

I'm on a roll ... !

I've really been pushing the envelop! The next wool quilting UFO I tackled didn't have much done. Some of the pieces, two trees and snowmen, were cut out as well as the background.

I rolled up my sleeves and begin working on the snowmen, sewing micro buttons, giving them a nose and some eyes. I just love snowmen!


Aren't they cute?!

Once that was done, I just kept plugging away until ....


The pattern is called Under the Christmas Tree by Renee Plains (Liberty Star). I just love the way it looks under a tree!


I will be doing a tutorial on how I completed this project. I had to deal with my fear of cutting out a project to become a tree skirt!

Thanks for stopping by! Catch you all later! Cheers!

Wednesday, February 7, 2018

Still in shock ....

I think my face is stuck in the "shock" position from my recent UFO discovery. lol You can read all about it here!

Yes, I'm still plugging away!

When I take up a quilting UFO, I wonder why I put the project aside. At other times, I know exactly why.

When I picked up this wool UFO, I knew without a doubt why I pushed it aside. I have a personality conflict with the stem stitch! There, now I said it.

Yes, sir! When it comes to doing the stem stitch, I just cannot seem to get the hang of it. Not sure why, it just didn't come easily for me. Hence the personality conflict.

I knew that I couldn't keep the project folded there forever. So, personality conflict aside, I tackled it.

The pattern is called Pumpkin Table Mat by Lisa Bongean of Primitive Gatherings.


The pumpkins and stems were the only things stitched. I tackled the leaves and then began dealing with this personality conflict. By the end of the last pumpkin, I think I worked it out!

The original pattern did call for a loopy vine connecting all the pumpkins, but I chose otherwise.

Here is the pattern picture so that you can see the difference.


 I like that my pumpkins are not connected to one another. Besides, I would have to do more stem stitch!!!!! Let's not push this girl to extreme!

Thanks for stopping by! Catch you all later! Cheers!
Related Posts Plugin for WordPress, Blogger...